Building a Blog Subscription and Pusher with AirCode and Resend
Introduction
Learn how to build subscription and push notification services in Node.js and Next.js, and send your first email using the Resend Node.js SDK on AirCode.
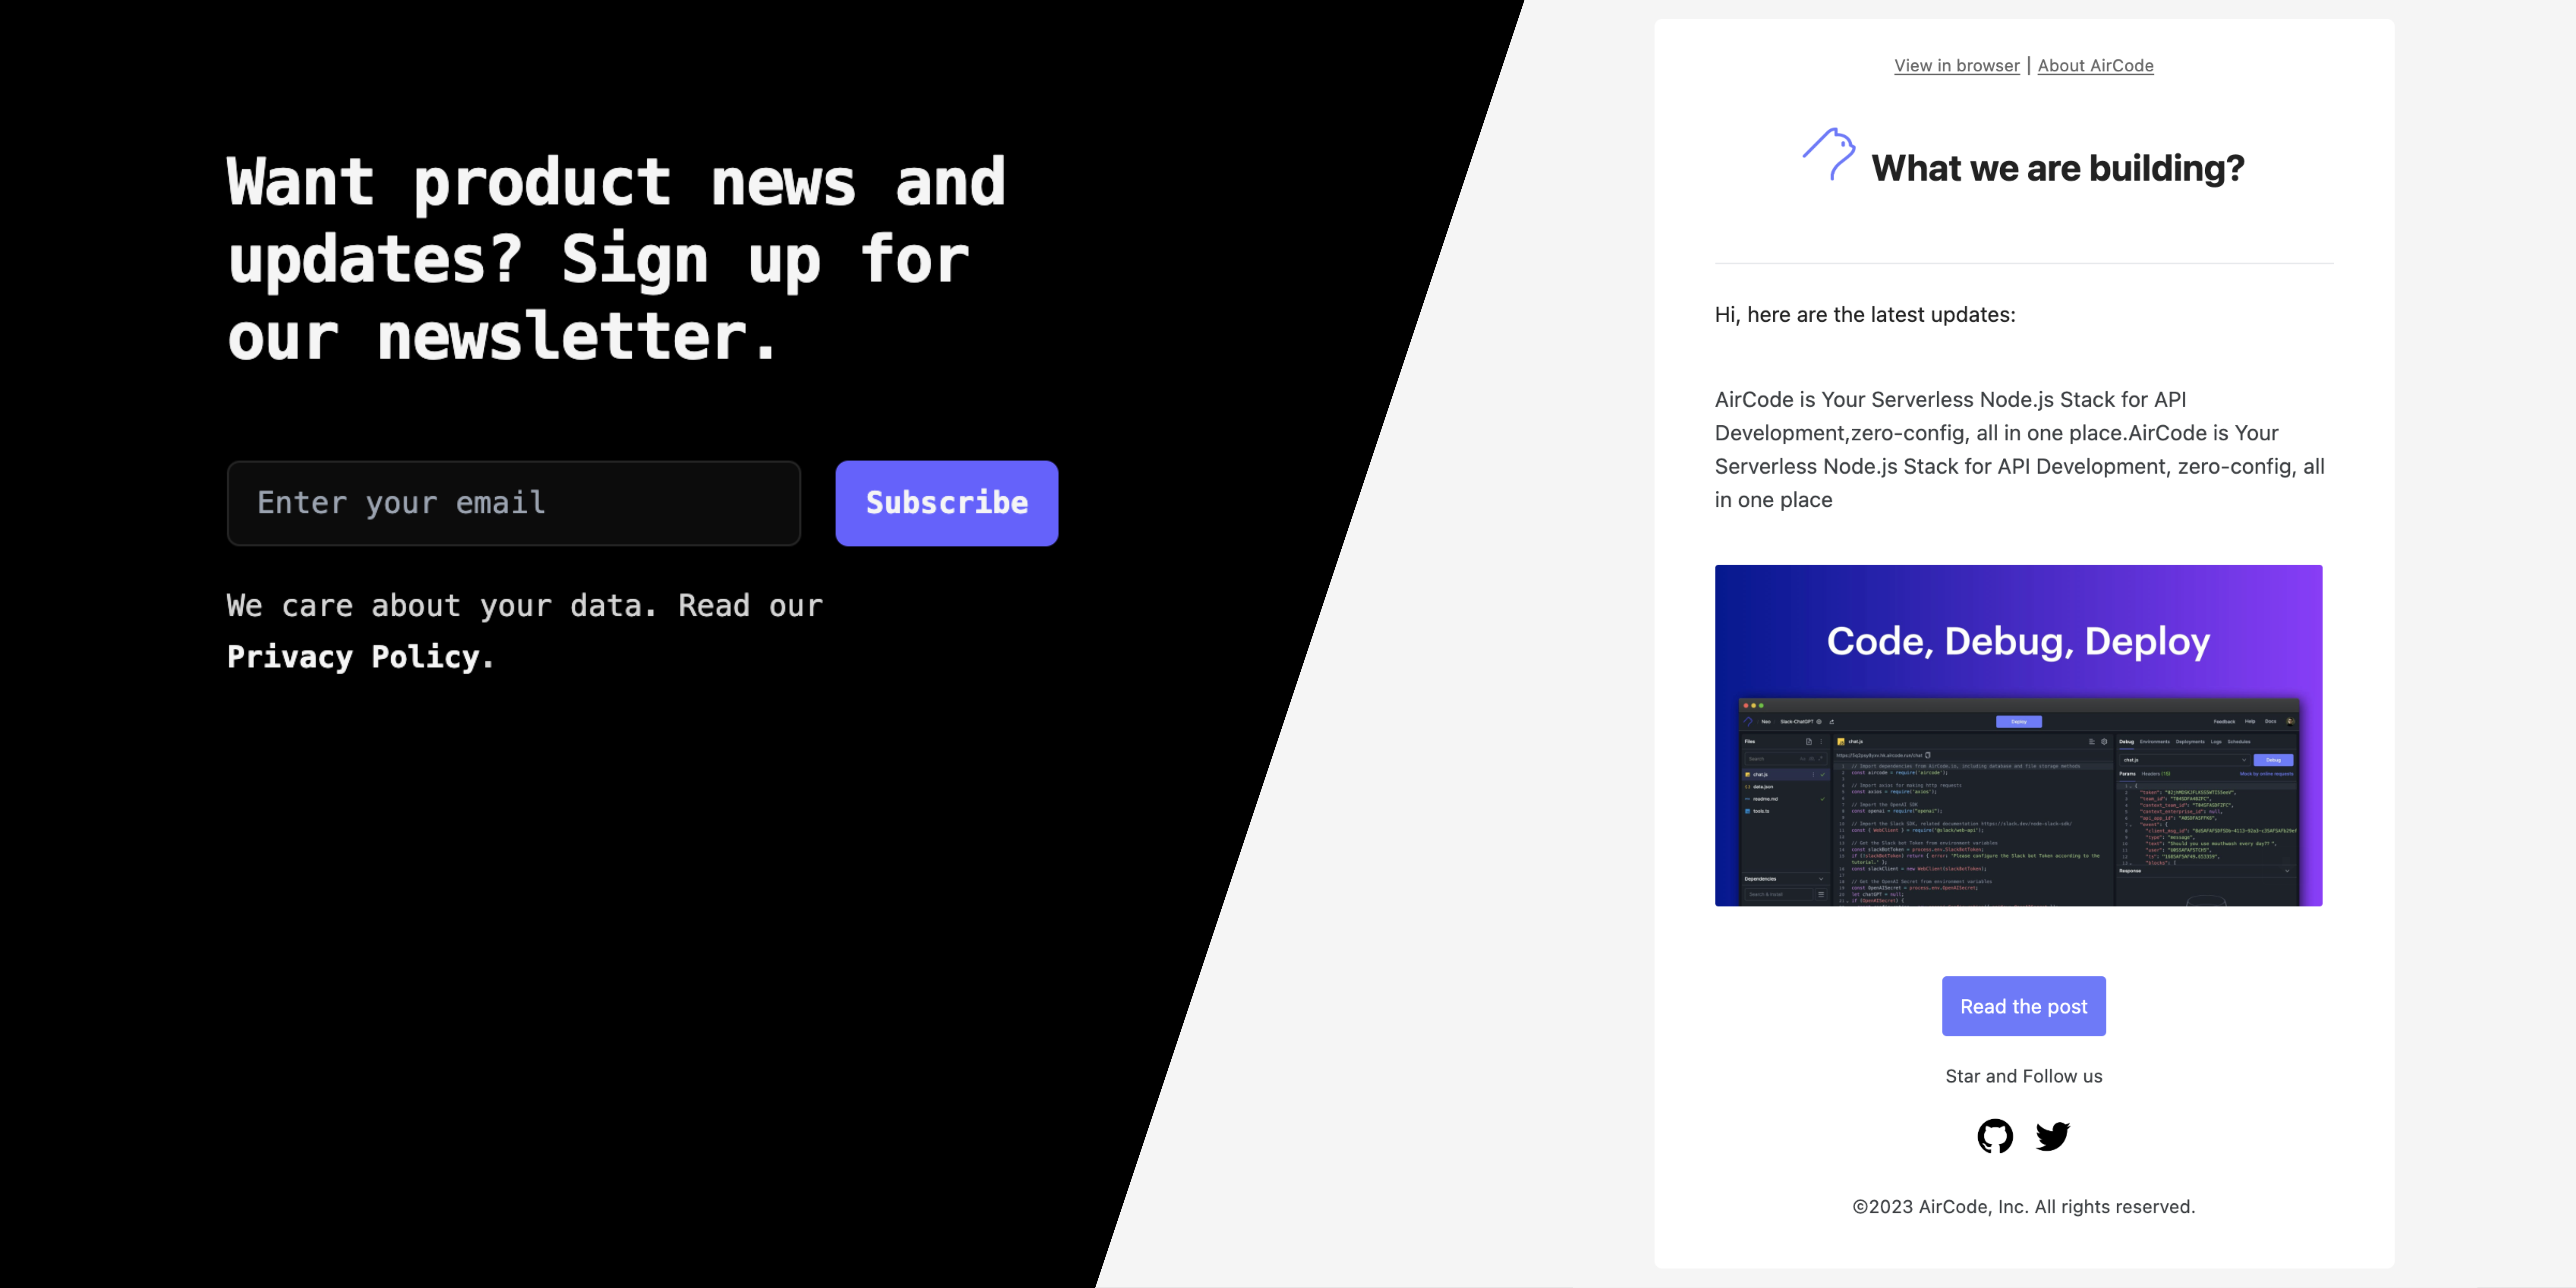
Here's what the finished page and email will look like:
Last week, we redesigned our website aircode.io, one of the important new features is our blog, which we hope will better connect with our users, the blog is all about sharing what we are working on and how we use AirCode, which brings us to today's post.
In this tutorial, I'll guide you through how I used AirCode and Resend to add basic subscription and email delivery features to the AirCode blog.
You'll learn:
- How to create a subscription form with Tailwind and Next.js
- How to build API in AirCode
- How to make nice email templates with react-email
- How to send email update notifications using Resend SDK
You can also directly check out the full source code on GitHub so you can get started fast!
- Front-end interface blog-subscription-form
- Back-end API and email pushing blog-subscription-and-email-pushing
Prerequisites
To get the most out of this guide, you’ll need two accounts, no worries, both of these are available in a free plan:
- AirCode Serverless Node.js stack for API development
- Resend Email service for developers, prepare an API key and verify your domain
Crafting the user interface
Before diving into the tutorial, let's briefly review the subscribe and push system. What are the functional requirements?
- An input field and button to submit a user's email
- An API endpoint to save data and communicate with the front-end
- An updatable email template for inserting dynamic post content
- An email delivery system for notifications
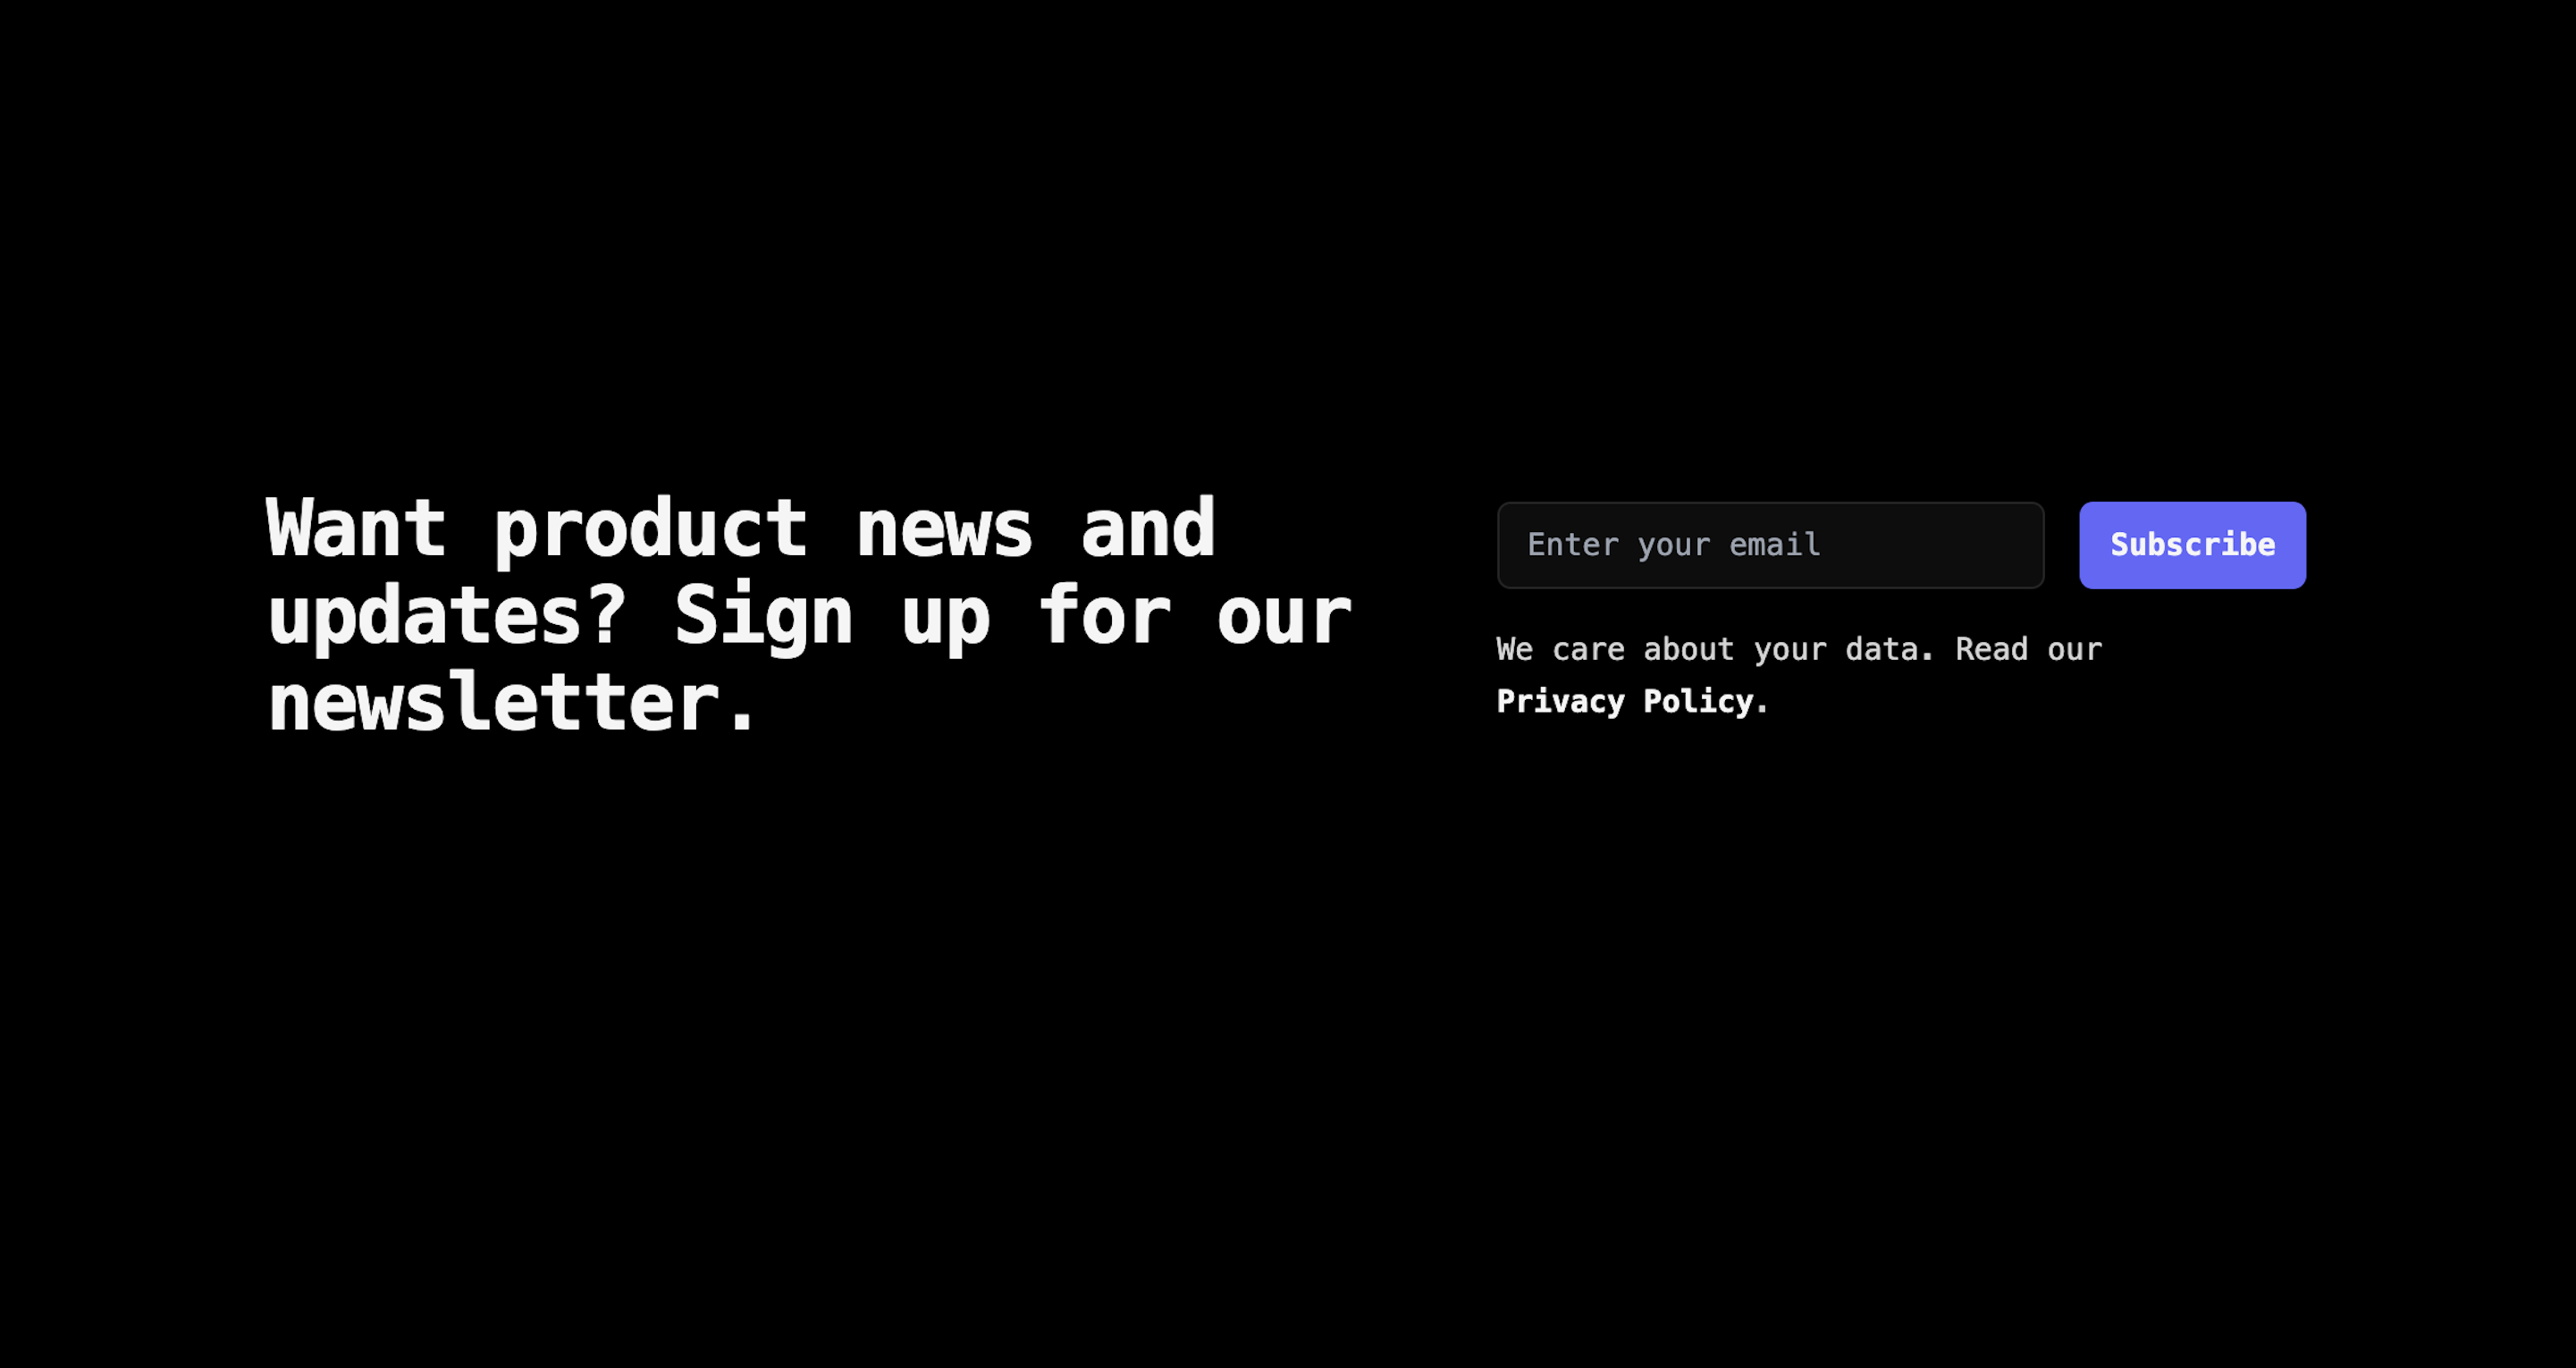
First, we'll create the user subscription interface for email input on our blog pages, I will use Next.js and Tailwind CSS for the interface.
Let's set it up.
Using create-next-app to create a subscribe-form folder for the web application as done below:
npx create-next-app@latest
On installation, you'll see the following prompts:
npx create-next-app@latest
✔ What is your project named? … subscribe-form
✔ Would you like to use TypeScript? … No / Yes
✔ Would you like to use ESLint? … No / Yes
✔ Would you like to use Tailwind CSS? … No / Yes
✔ Would you like to use `src/` directory? … No / Yes
✔ Would you like to use App Router? (recommended) … No / Yes
✔ Would you like to customize the default import alias? … No / Yes
After Initialized git and Installing dependencies, Congratulations! 🎉 You can now start the app by using the command below.
npm run dev
Find the page.tsx in src/app/page.tsx, copy the code snippet below to replace the default page content:
"use client"
import { useState } from 'react'
export default function Home() {
const onSubscribe = async (_e) => {}
const [email, setEmail] = useState('')
const [message, setMessage] = useState('')
const onChange = (email: string): void => {
setEmail(email)
if (message) {
setMessage('')
}
}
return (
<main className="flex min-h-screen flex-col items-center justify-between p-24 bg-black">
<div className="z-10 max-w-5xl w-full items-center justify-between font-mono text-sm lg:flex">
<div className="py-16 sm:py-24 lg:py-32">
<div className="mx-auto grid max-w-7xl grid-cols-1 gap-10 px-6 lg:grid-cols-12 lg:gap-8 lg:px-8">
<div className="max-w-2xl text-3xl font-bold tracking-tight text-neutral-100 sm:text-4xl lg:col-span-7">
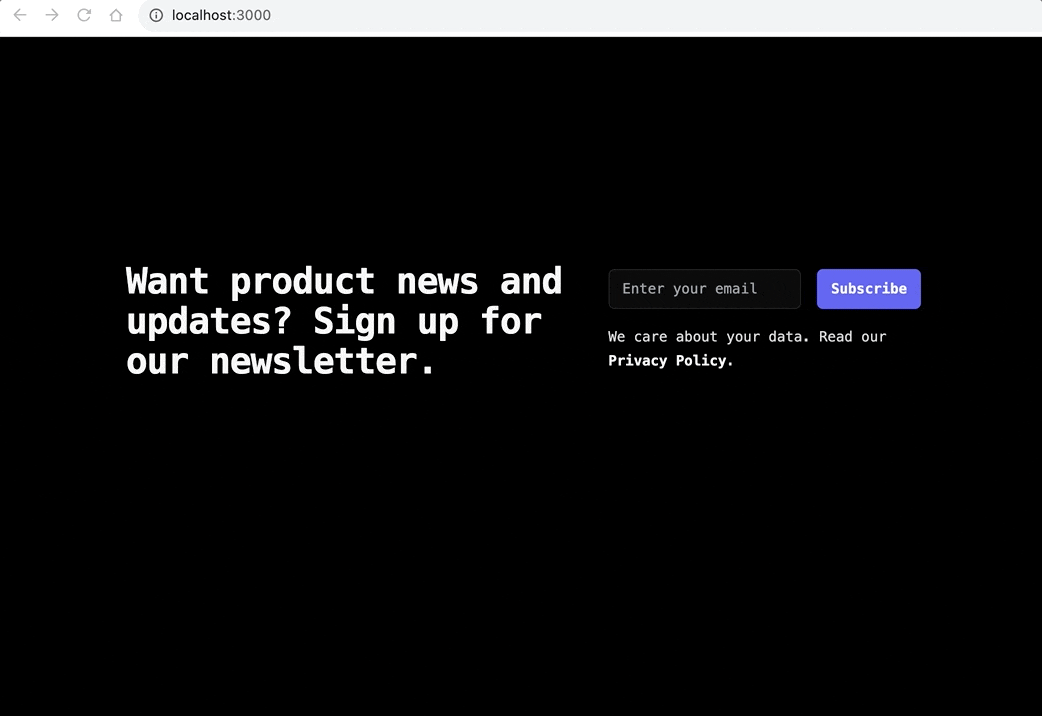
<p className="inline sm:block lg:inline xl:block">Want product news and updates?</p>{' '}
<p className="inline sm:block lg:inline xl:block">Sign up for our newsletter.</p>
</div>
<form className="w-full max-w-md lg:col-span-5 lg:pt-2" onSubmit={onSubscribe}>
<div className="flex gap-x-4">
<label htmlFor="email-address" className="sr-only">
Email address
</label>
<input
id="email-address"
name="email"
type="email"
autoComplete="email"
required
className="min-w-0 flex-auto rounded-md border-0 bg-neutral-100/5 px-3.5 py-2 text-neutral-100 shadow-sm ring-1 ring-inset ring-neutral-100/10 focus:ring-2 focus:ring-inset focus:ring-indigo-500 sm:text-sm sm:leading-6"
placeholder="Enter your email"
value={email}
onChange={(e) => onChange(e.target.value)}
/>
<button
type="submit"
className="flex-none rounded-md bg-indigo-500 px-3.5 py-2.5 text-sm font-semibold text-neutral-100 shadow-sm hover:bg-indigo-400 focus-visible:outline focus-visible:outline-2 focus-visible:outline-offset-2 focus-visible:outline-indigo-500"
>
Subscribe
</button>
</div>
<div className='mt-2.5 leading-6'>
{ <span className='text-[13px] block text-[#8a8f98] font-medium'>{ message }</span> }
</div>
<p className="mt-4 text-sm leading-6 text-neutral-300">
We care about your data. Read our{' '}
<a href="https://docs.aircode.io/legal/privacy-policy" className="font-semibold text-neutral-100">
Privacy Policy
</a>
.
</p>
</form>
</div>
</div>
</div>
</main>
)
}
Save the code, then you will see an elegant subscribe form like this:
Communicating with Node.js API in AirCode
Create an AirCode App
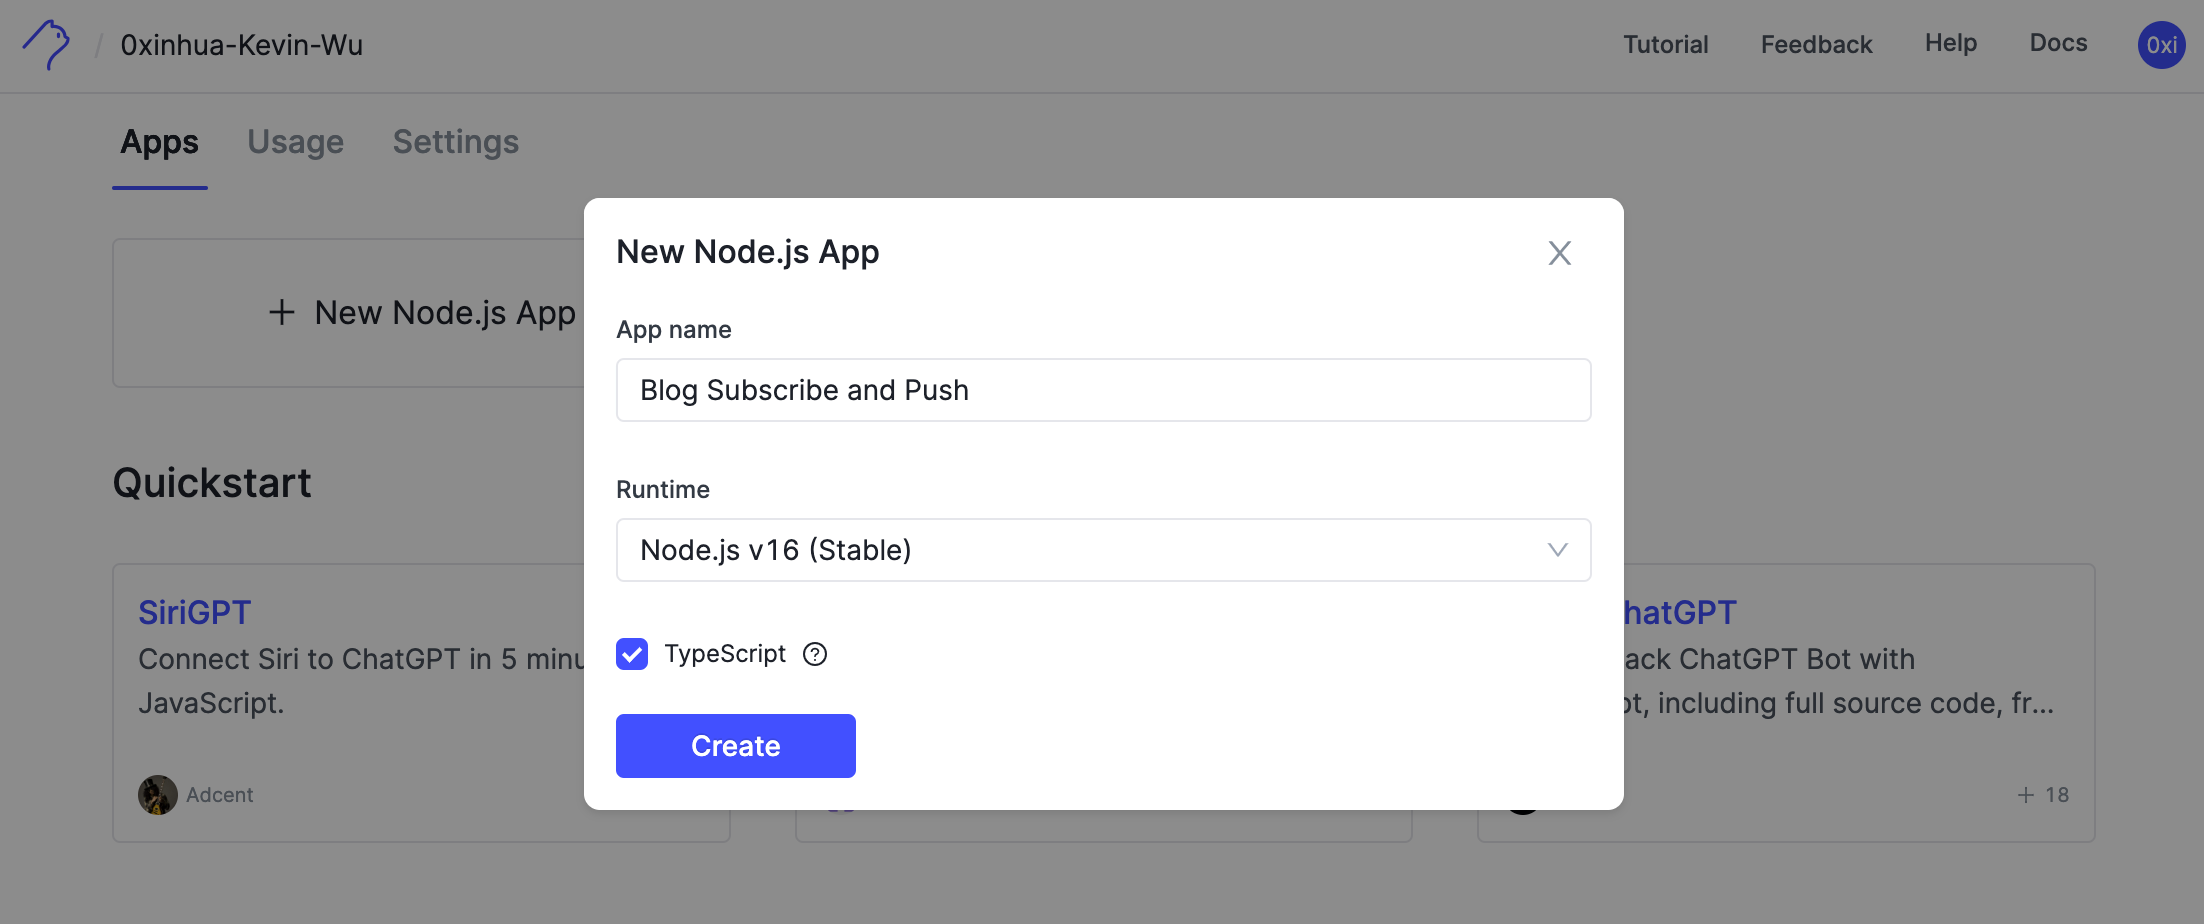
In this section, you'll learn how to communicate with your Node.js server by creating an API in AirCode.
Before we start coding, log in to aircode.io/login and create a new app. Input an app name and select the TypeScript option:
After entering the dashboard page,
- Change the default
hello.tsfile name withsubscribe.ts. - Click the
Deploybutton deploy your first API in the second.

Copy the invoke url into the browser, now you have your first interactive RESTful API.
https://byq3nrmbgm.us.aircode.run/subscribe
Submit Email
Back to the front end, when submitting the subscription form, we'll send the form data to the server. Let's add some code.
In a Next.js client component, if you need to fetch data, you can call a Route Handler. Next.js extends the native fetch Web API, allowing you to configure caching and revalidation behavior for each fetch request on the server. Alternatively, you can use a third-party library for requesting. In this case, I'm using SWR as recommended in the documentation.
Use the following shell to install swr:
npm install swr
Copy the following code in this file:
import { useRef, useState } from 'react'
import useSWRMutation from 'swr/mutation'

  const emailRef = useRef<HTMLInputElement>()
  const [email, setEmail] = useState('')
  const [message, setMessage] = useState('')

  const onChange = (email: string): void => {
    setEmail(email)
    if (message) {
      setMessage('')
    }
  }

  async function sendRequest(url: string, { arg }: { arg: { email: string }}) {
    return fetch(url, {
      method: 'POST',
      body: JSON.stringify(arg)
    }).then(res => res.json())
  }

  // replace with your invoke url you got in the previous step
  const { trigger, isMutating } = useSWRMutation('https://byq3nrmbgm.us.aircode.run/subscribe', sendRequest, /* options */)

  const subscribe = async (e) => {
    e.preventDefault();
    if(!email && emailRef.current) {
      emailRef.current.focus()
      setMessage('Please fill out email field.')
      return
    }
    try {
      const result = await trigger({ email }, /* options */)
      console.log('subscribe result: ', result)

      const { message, code } = result
      if (message) {
        setMessage(result?.message)
      }

      if (code === 0) {
        setEmail('')
      }

    } catch (e) {
      let message = 'An error has occurred. '
      if (e?.message) {
        message += `error message: ${e.message}. `;
      }
      message += 'please try again later.'
      setMessage(message)
    }
  };
You will find a TS error in the module importing:
Cannot find module 'swr/mutation'. Did you mean to set the 'moduleResolution' option to 'node',
or to add aliases to the 'paths' option?ts(2792)
This error occurs when TypeScript cannot find the swr/mutation module during compilation. There are a couple of things you can try to resolve it, set moduleResolution to node in your tsconfig.json:
{
  "compilerOptions": {
    "target": "es5",
    "lib": ["dom", "dom.iterable", "esnext"],
    "allowJs": true,
    "skipLibCheck": true,
    "strict": true,
    "noEmit": true,
    "esModuleInterop": true,
    "module": "esnext",
    "moduleResolution": "node",
    "resolveJsonModule": true,
    "isolatedModules": true,
    "jsx": "preserve",
    "incremental": true,
    "plugins": [
      {
        "name": "next"
      }
    ],
    "paths": {
      "@/*": ["./src/*"]
    }
  },
  "include": ["next-env.d.ts", "**/*.ts", "**/*.tsx", ".next/types/**/*.ts"],
  "exclude": ["node_modules"]
}
From the code snippet above, when user input their email and click the submit button, we use swr/mutation trigger HTTP fetching.You need to replace with your invoke url you got in the previous step in this line:
// replace with your invoke url got in the previous step after your deploy
const { trigger, isMutating } = useSWRMutation('https://byq3nrmbgm.us.aircode.run/subscribe', sendRequest, /* options */)
You can try to input an email and then send it to your api server, if you see the following response Hi, AirCode., Congratulations, your first subscribe API is ready.
Integrating next.js with Serverless function
And now, we can let AirCode save our data! Let's enrich our subscribe function!
When we receive a request, We can currently add simple validations:
- First which must be non-null
- The passed email parameter must be in the correct email format
- Third, if the current mailbox has been subscribed, respond correct message
We need to validate the email parameter to check if it's a properly formatted email address before storing it in the database.
// @see https://docs.aircode.io/guide/functions/
import aircode from 'aircode';

const regex = /^[^\s@]+@[^\s@]+\.[^\s@]+$/;

export default async function (params: any, context: any) {
  console.log('Received params:', params, typeof params);

  const { email } = params;

  console.log('email', email);

  if (!email) {
    return {
      code: 1,
      message: 'Email required.',
    };
  }

  if (!regex.test(email)) {
    return {
      code: 1,
      message: 'Invalid email.',
    };
  }

}
The code snippet above accepts a post request from the next.js subscribes App with the user's email, After the simple validation, we need to use the database to store the data.
In AirCode you don't need to set up a MySQL or other NoSQL database, you just need new a table and save your data.
try {
  // Get the emails table
  const EmailsTable = aircode.db.table('emails');

  // Find email by address
  const matchedRecord = await EmailsTable.where({ email }).findOne();

  if (matchedRecord) {
    return {
      code: 0,
      message: 'Your email is already in our subscription list.',
    };
  }

  // Insert a new email
  const newEmail = {
    email,
  };

  await EmailsTable.save(newEmail);

  return {
    code: 0,
    message: 'You have been successfully subscribed to our newsletter.',
  };
} catch (err) {
  return {
    code: 1,
    message: `An error occurred while subscribing, please try again later, the error message: ${err}`,
  };
}
From the code snippet above:
- Create an
emailstable saving data withaircode.db.table(tableName) - Find one matching records through
where({ field: value }).findOne(), check whether the user is already subscribed - Insert one record at once via
Table.save(record),saveis an async function, so it needs to use await to ensure that the execution ends.
Create a beautiful email template for blog updates
When comes to building an Email template, It's just not an enjoyable experience, typically, you can only send emails using HTML or plain text, and:
- You can't see the results in real time before you send them for testing
- There may be compatibility issues in the display of various email systems
Thanks @react-email an open source helping build email with React components and Tailwind CSS.
Let's quickly render an email template in AirCode:
Create a email Component
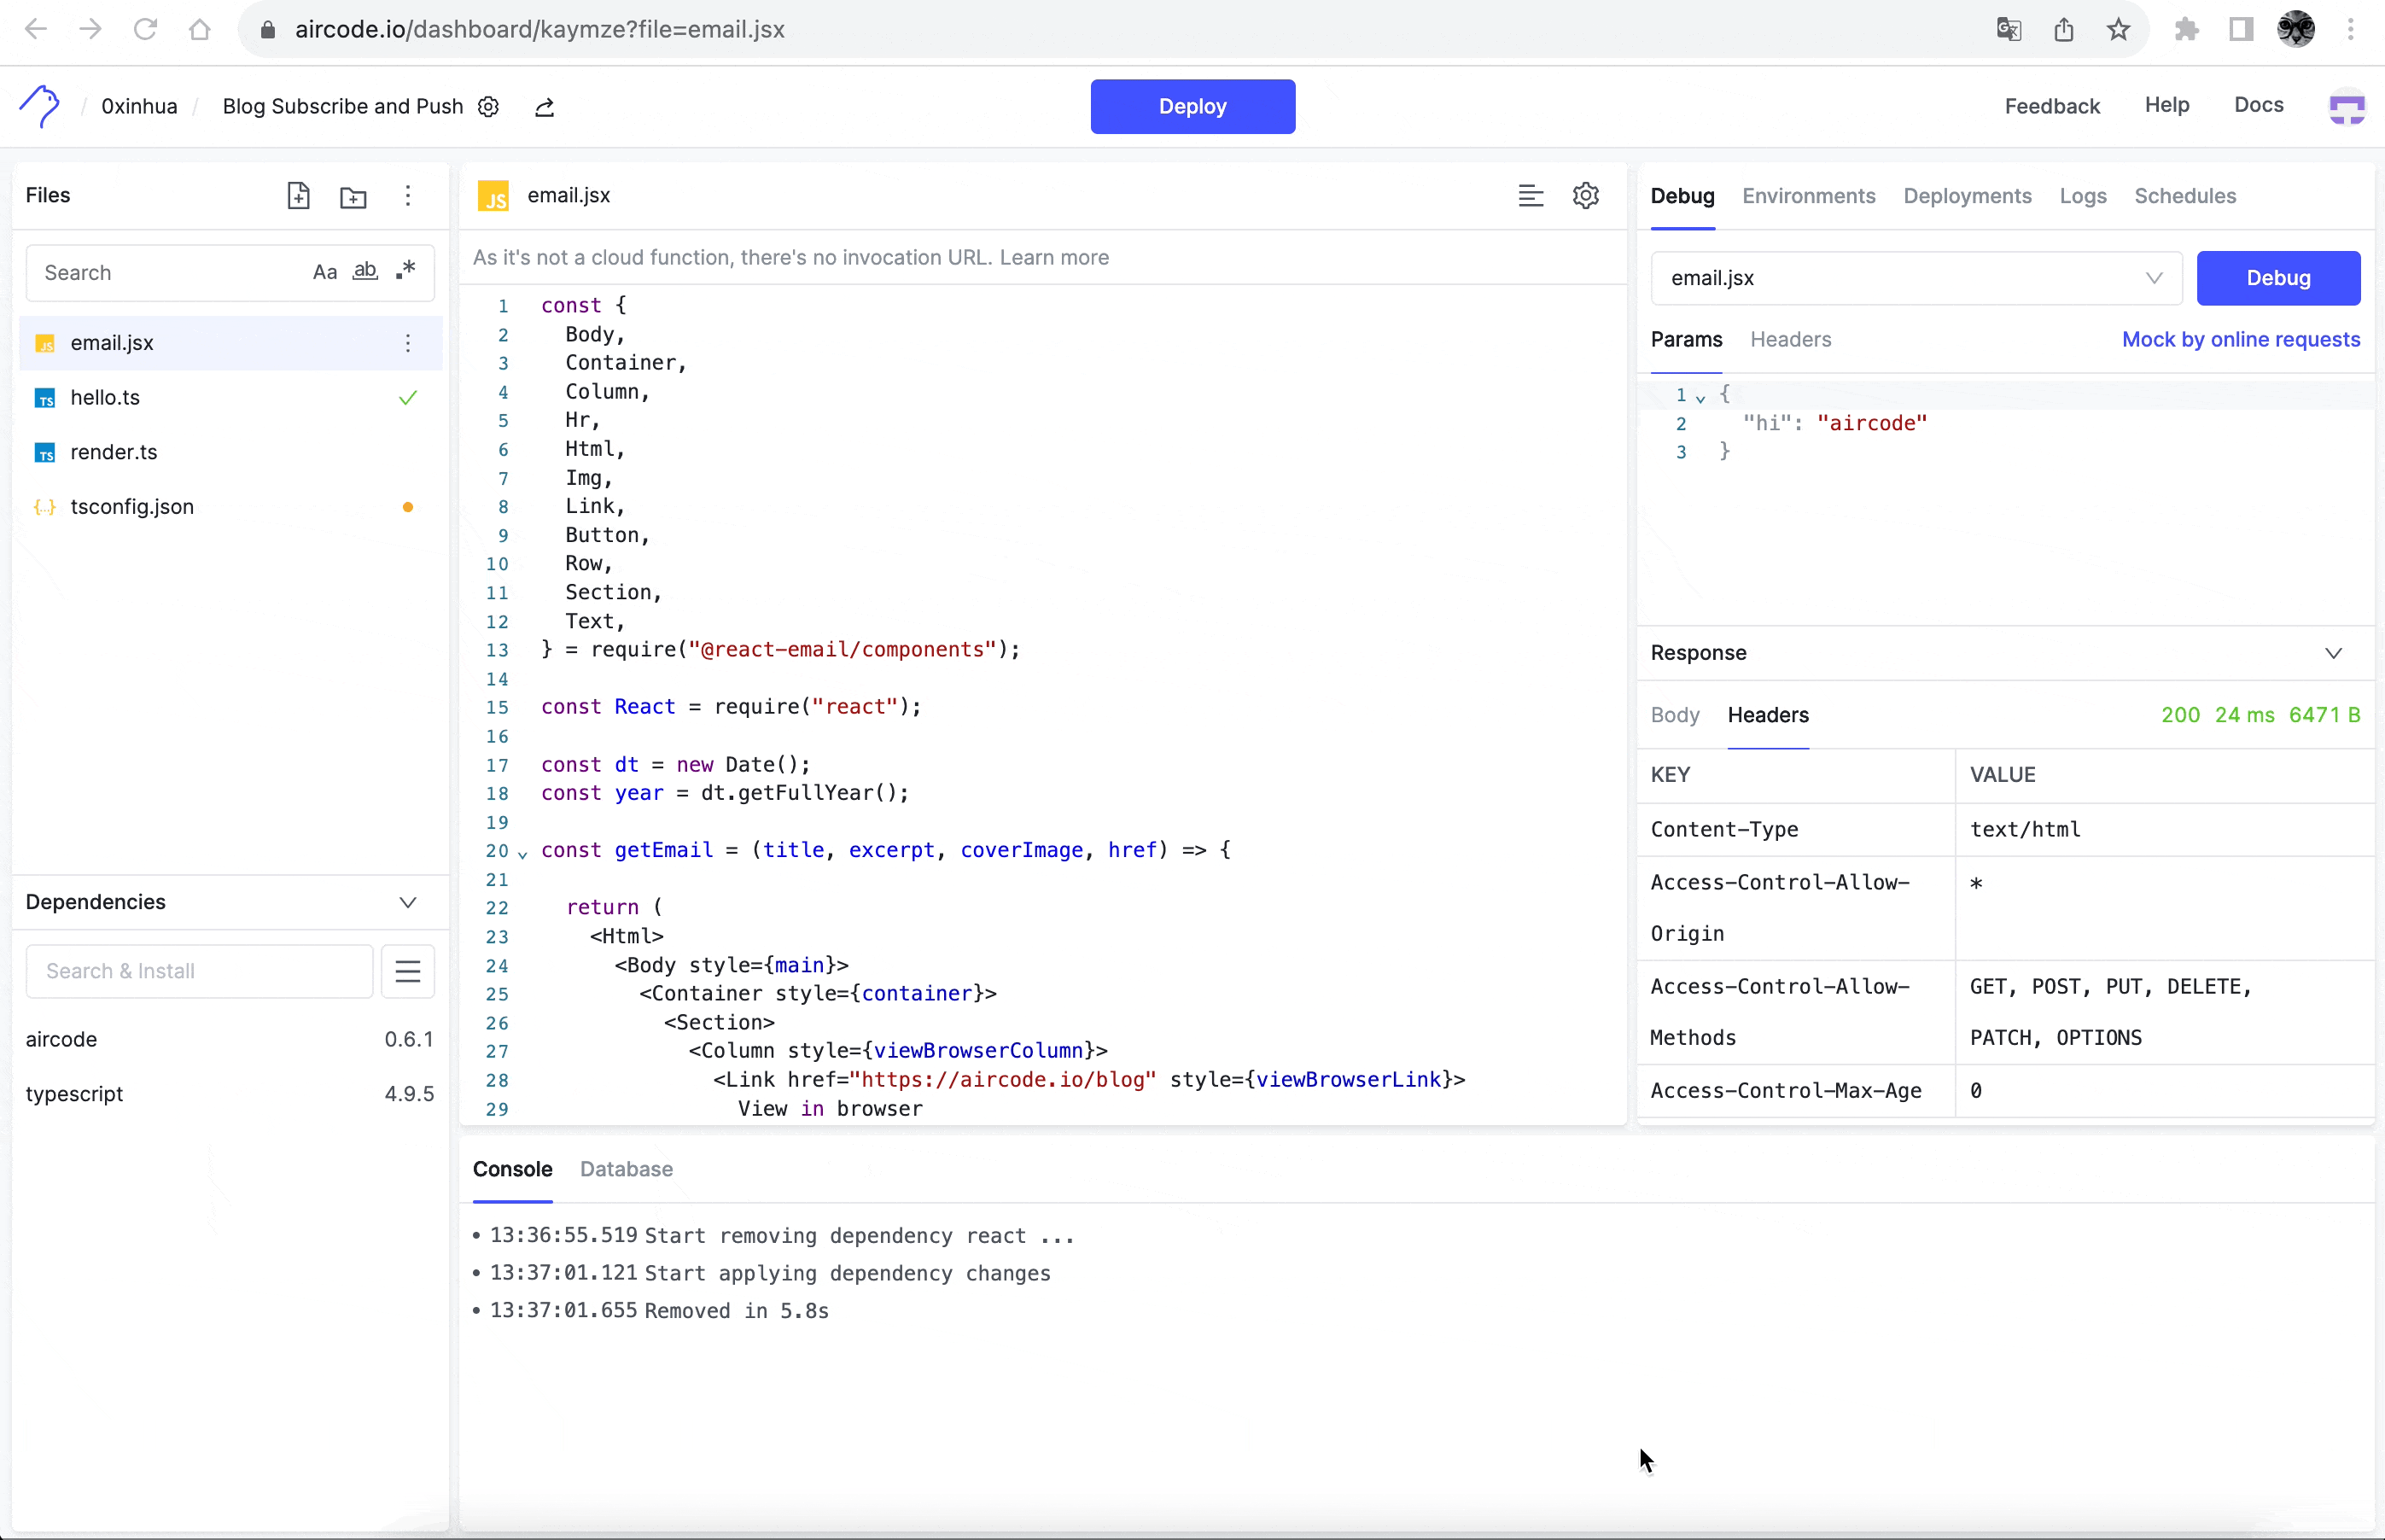
Add a email.jsx for our email template, replace with the following content:
const {
  Body,
  Container,
  Column,
  Hr,
  Html,
  Img,
  Link,
  Button,
  Row,
  Section,
  Text,
} = require("@react-email/components");

const React = require("react");

const dt = new Date();
const year = dt.getFullYear();

const getEmail = ({ post }) => {

  const { title, excerpt, coverImage, href } = post;

  return (
    <Html>
      <Body style={main}>
        <Container style={container}>
          <Section>
            <Column style={viewBrowserColumn}>
              <Link href="https://aircode.io/blog" style={viewBrowserLink}>
                View in browser
              </Link>
              <Text style={splitLine}>|</Text>
              <Link href="https://docs.aircode.io/" style={viewBrowserLink}>
                About AirCode
              </Link>
            </Column>
            <Column style={sectionHeader}>
              <Img
                style={sectionLogo}
                src="https://aircode.io/aircode-icon.svg"
                width="50px"
                height="31"
                alt="logo"
              />
              <h2>AirCode Blog Update</h2>
            </Column>
          </Section>

          <Section style={paragraphContent}>
            <Hr style={hr} />
            <Text style={heading}>Hi there,</Text>
            <Text style={paragraph}>
              Here are the latest updates form our blog:
              <Link style={postTitle} href={href}>
                {title}
              </Link>
            </Text>
          </Section>

          <Section style={paragraphContent}>
            <Column>
              <Text style={paragraph}>{excerpt}</Text>
            </Column>
          </Section>

          <Section style={paragraphContent}>
            <Column style={postImage}>
              <Img src={coverImage} alt="What we are building" width="400px" />
            </Column>
          </Section>

          <Section style={paragraphContent}>
            <Column style={btnContainer}>
              <Button
                pX={12}
                pY={12}
                style={button}
                href={href}
              >
                Read the post
              </Button>
            </Column>
          </Section>

          <Section style={containerContact}>
            <Text style={mediaParagraph}>Star and Follow us</Text>
            <Row style={{ marginBottom: "20px" }}>
              <Column>
                <Link
                  href="https://github.com/aircodelabs/aircode"
                  style={mediaLink}
                >
                  <Img
                    width="28"
                    height="28"
                    src="https://aircode.io/github-icon.svg"
                  />
                </Link>
              </Column>
              <Column>
                <Link href="https://twitter.com/aircode_io">
                  <Img
                    width="28"
                    height="28"
                    src="https://aircode.io/twitter-icon.svg"
                  />
                </Link>
              </Column>
            </Row>
          </Section>

          <Section style={{ ...paragraphContent, paddingBottom: 30 }}>
            <Text
              style={{
                ...paragraph,
                fontSize: "12px",
                textAlign: "center",
                margin: 0,
              }}
            >
              {`©${year}  AirCode, Inc. All rights reserved.`}
            </Text>
          </Section>
        </Container>
      </Body>
    </Html>
  );
};

module.exports = getEmail;

const main = {
  padding: "10px 2px",
  backgroundColor: "#f5f5f5",
  fontFamily:
    '-apple-system,BlinkMacSystemFont,"Segoe UI",Roboto,Oxygen-Sans,Ubuntu,Cantarell,"Helvetica Neue",sans-serif',
};

const sectionHeader = {
  paddingTop: "20px",
  display: "flex",
  justifyContent: "center",
  alignItems: "center",
};

const viewBrowserColumn = {
  color: "#666",
  padding: "20px 0",
  display: "flex",
  justifyContent: "center",
  alignItems: "center",
};

const splitLine = {
  lineHeight: "10px",
  margin: "0 4px",
};

const viewBrowserLink = {
  fontSize: "11px",
  lineHeight: "10px",
  textUnderlinePosition: "from-font",
  textDecoration: "underline",
  color: "#666",
  textDecorationColor: "#666",
};

const sectionLogo = {
  padding: "0 10px",
};

const container = {
  margin: "30px auto",
  width: "610px",
  backgroundColor: "#fff",
  borderRadius: 5,
  overflow: "hidden",
};

const containerContact = {
  width: "100%",
  borderRadius: "5px",
  overflow: "hidden",
  display: "flex",
  justifyContent: "center",
  alignItems: "center",
  textAlign: "center",
};

const mediaLink = {
  display: "flex",
  justifyContent: "center",
  alignItems: "center",
  textAlign: "center",
};

const postTitle = {
  marginLeft: "10px",
  fontSize: "16px",
  lineHeight: "26px",
  fontWeight: "700",
  color: "#6B7AFF",
};

const postImage = {
  display: "flex",
  justifyContent: "center",
  alignItems: "center",
};

const mediaParagraph = {
  fontSize: "12px",
  lineHeight: "20px",
  color: "#3c4043",
};

const heading = {
  fontSize: "14px",
  lineHeight: "26px",
};

const btnContainer = {
  padding: "10px 20px",
  display: "flex",
  justifyContent: "center",
};

const button = {
  backgroundColor: "#6B7AFF",
  borderRadius: "3px",
  color: "#fff",
  textDecoration: "none",
  textAlign: "center",
  display: "block",
  marginTop: "26px",
};

const paragraphContent = {
  padding: "0 40px",
};

const paragraph = {
  fontSize: "14px",
  lineHeight: "22px",
  color: "#3c4043",
};

const hr = {
  borderColor: "#e8eaed",
  margin: "20px 0",
};
Render the component to an HTML string
Add a render.ts function to convert components to string text content, the code:
// https://react.email/docs/utilities/render
require('@babel/register')({
  presets: ['@babel/preset-react'],
});

import aircode from 'aircode';

const getEmail  = require('./email.jsx');

import { render } from '@react-email/render';

// test data for email template
const post = {
  href: "https://aircode.io/blog/why-create-aircode",
  title: "What we are building",
  excerpt: `AirCode is Your Serverless Node.js Stack for API Development,
  zero-config, all in one place.AirCode is Your Serverless Node.js
  Stack for API Development, zero-config, all in one place`,
  coverImage:
    "https://ph-files.imgix.net/b41dc780-1623-4c46-90b9-1a0d514c5730.jpeg?auto=compress&codec=mozjpeg&cs=strip&auto=format&fit=max&dpr=2",
};

export default async function (params: any, context: any) {

  const html = render(getEmail({ post }));

  context.set('content-type', 'text/html');

  return html;
};
We need those dependencies:
@react-email/componentsandreactfor building component@babel/registerand@babel/preset-react@react-email/renderfor transform and render,
Let's install it in the Dependencies panel, after all dependencies are installed, click the debug button to test your code. If there are no other errors, you will see your email template HTML in the console and response panels.
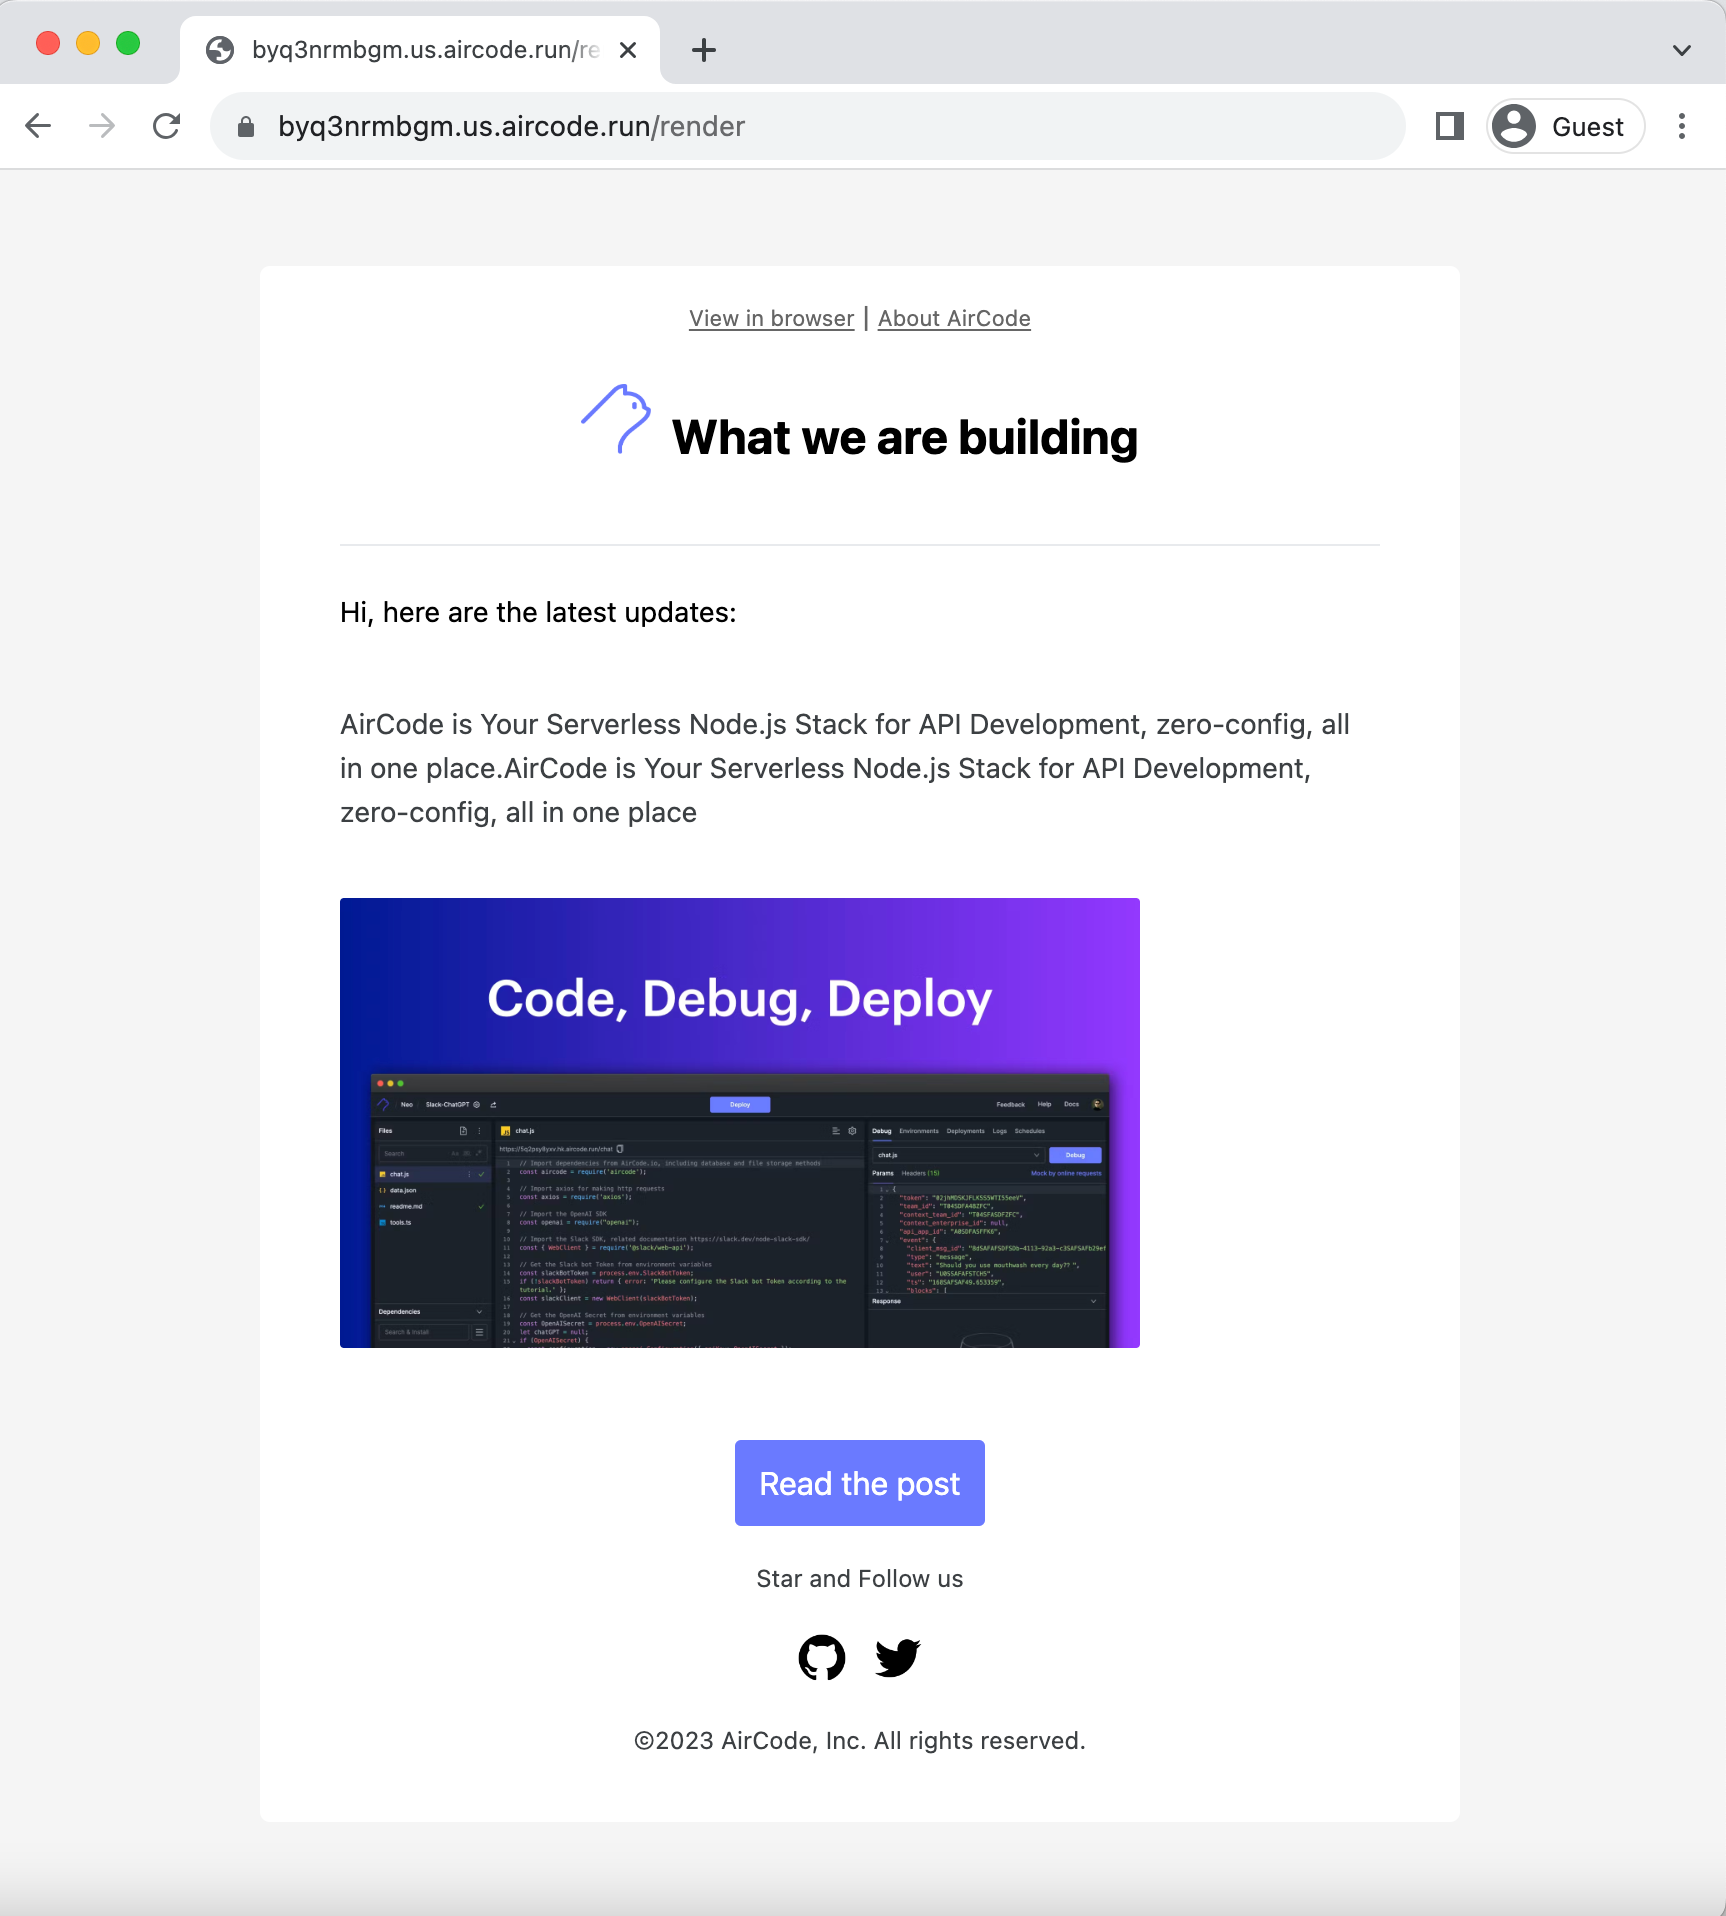
You can also host the template online by click the Deploy button,copy the invoke URL to the browser, now you can check and review what your email looks like when you open it in your mailbox.
Using Resend SDK to deliver the email
Now we have the data and email template, the last thing is to send the updates notification to the subscriber through email.
Prerequisites
Let's learn how to send your first email using the Resend Node.js SDK. First we need add a deliver.ts function as an email poster:
Before coding, To get the most out of this guide, you’ll need to:
We need the Resend Node.js SDK. Search resend lib and install this SDK in Dependencies panel like before. The example code from docs is very easy to use.
import { Resend } from 'resend';
// use your own key
const resend = new Resend('re_123456789');

try {
  const data = await resend.emails.send({
    from: 'Acme <onboarding@resend.dev>',
    to: ['delivered@resend.dev'],
    subject: 'Hello World',
    // use your email template
    html: '<strong>It works!</strong>',
  });

  console.log(data);
} catch (error) {
  console.error(error);
}
Send email using HTML template
Send an email by using the html parameter with the template you have done before, the to from the database you have collected. See the full deliver source code.
require('@babel/register')({
  presets: ['@babel/preset-react'],
});

type RecordItem = {
  email: string,
};

import aircode from 'aircode';

const getEmail = require('./email.jsx');
const { render } = require('@react-email/render');

const { Resend } = require('resend');

const resend = new Resend(process.env.RESEND_API_KEY);

module.exports = async function (params: any, context: any) {
  console.log('Received params:', params);

  const { title, excerpt, coverImage, href } = params;

  const html = render(getEmail(title, excerpt, coverImage, href));

  const emailTables = aircode.db.table('emails');

  const emailsRecords = await emailTables
    .where()
    .projection({ email: 1 })
    .find();

  console.log('emailsRecords', emailsRecords);

  if (emailsRecords && emailsRecords.length) {
    const emailList = emailsRecords.map((item) => item.email);

    console.log('emails', emailList);

    // In Resend docs, Sending to a batch of recipients is not yet supported, but you can send to each recipient individually
    // see https://resend.com/docs/knowledge-base/can-i-send-newsletters-with-resend
    try {
      const data = await resend.emails.send({
        from: 'hello@aircode.io',
        to: emailList,
        subject: 'AirCode updates',
        html,
      });

      console.log(data);
      return {
        data,
        code: 0,
        message: 'success',
      };
    } catch (error) {
      console.error(error);
      return {
        data: null,
        code: 1,
        message: error,
      };
    }
  }
  return {
    data: null,
    message: 'There is no mailing list to deliver, please add email.',
  };
};
You need to paste this key RESEND_API_KEY form Resend into the AirCode environment settings before you test it, just like the below:

Add your post data in params for debugging email delivery, click the Debug button to send the first email.
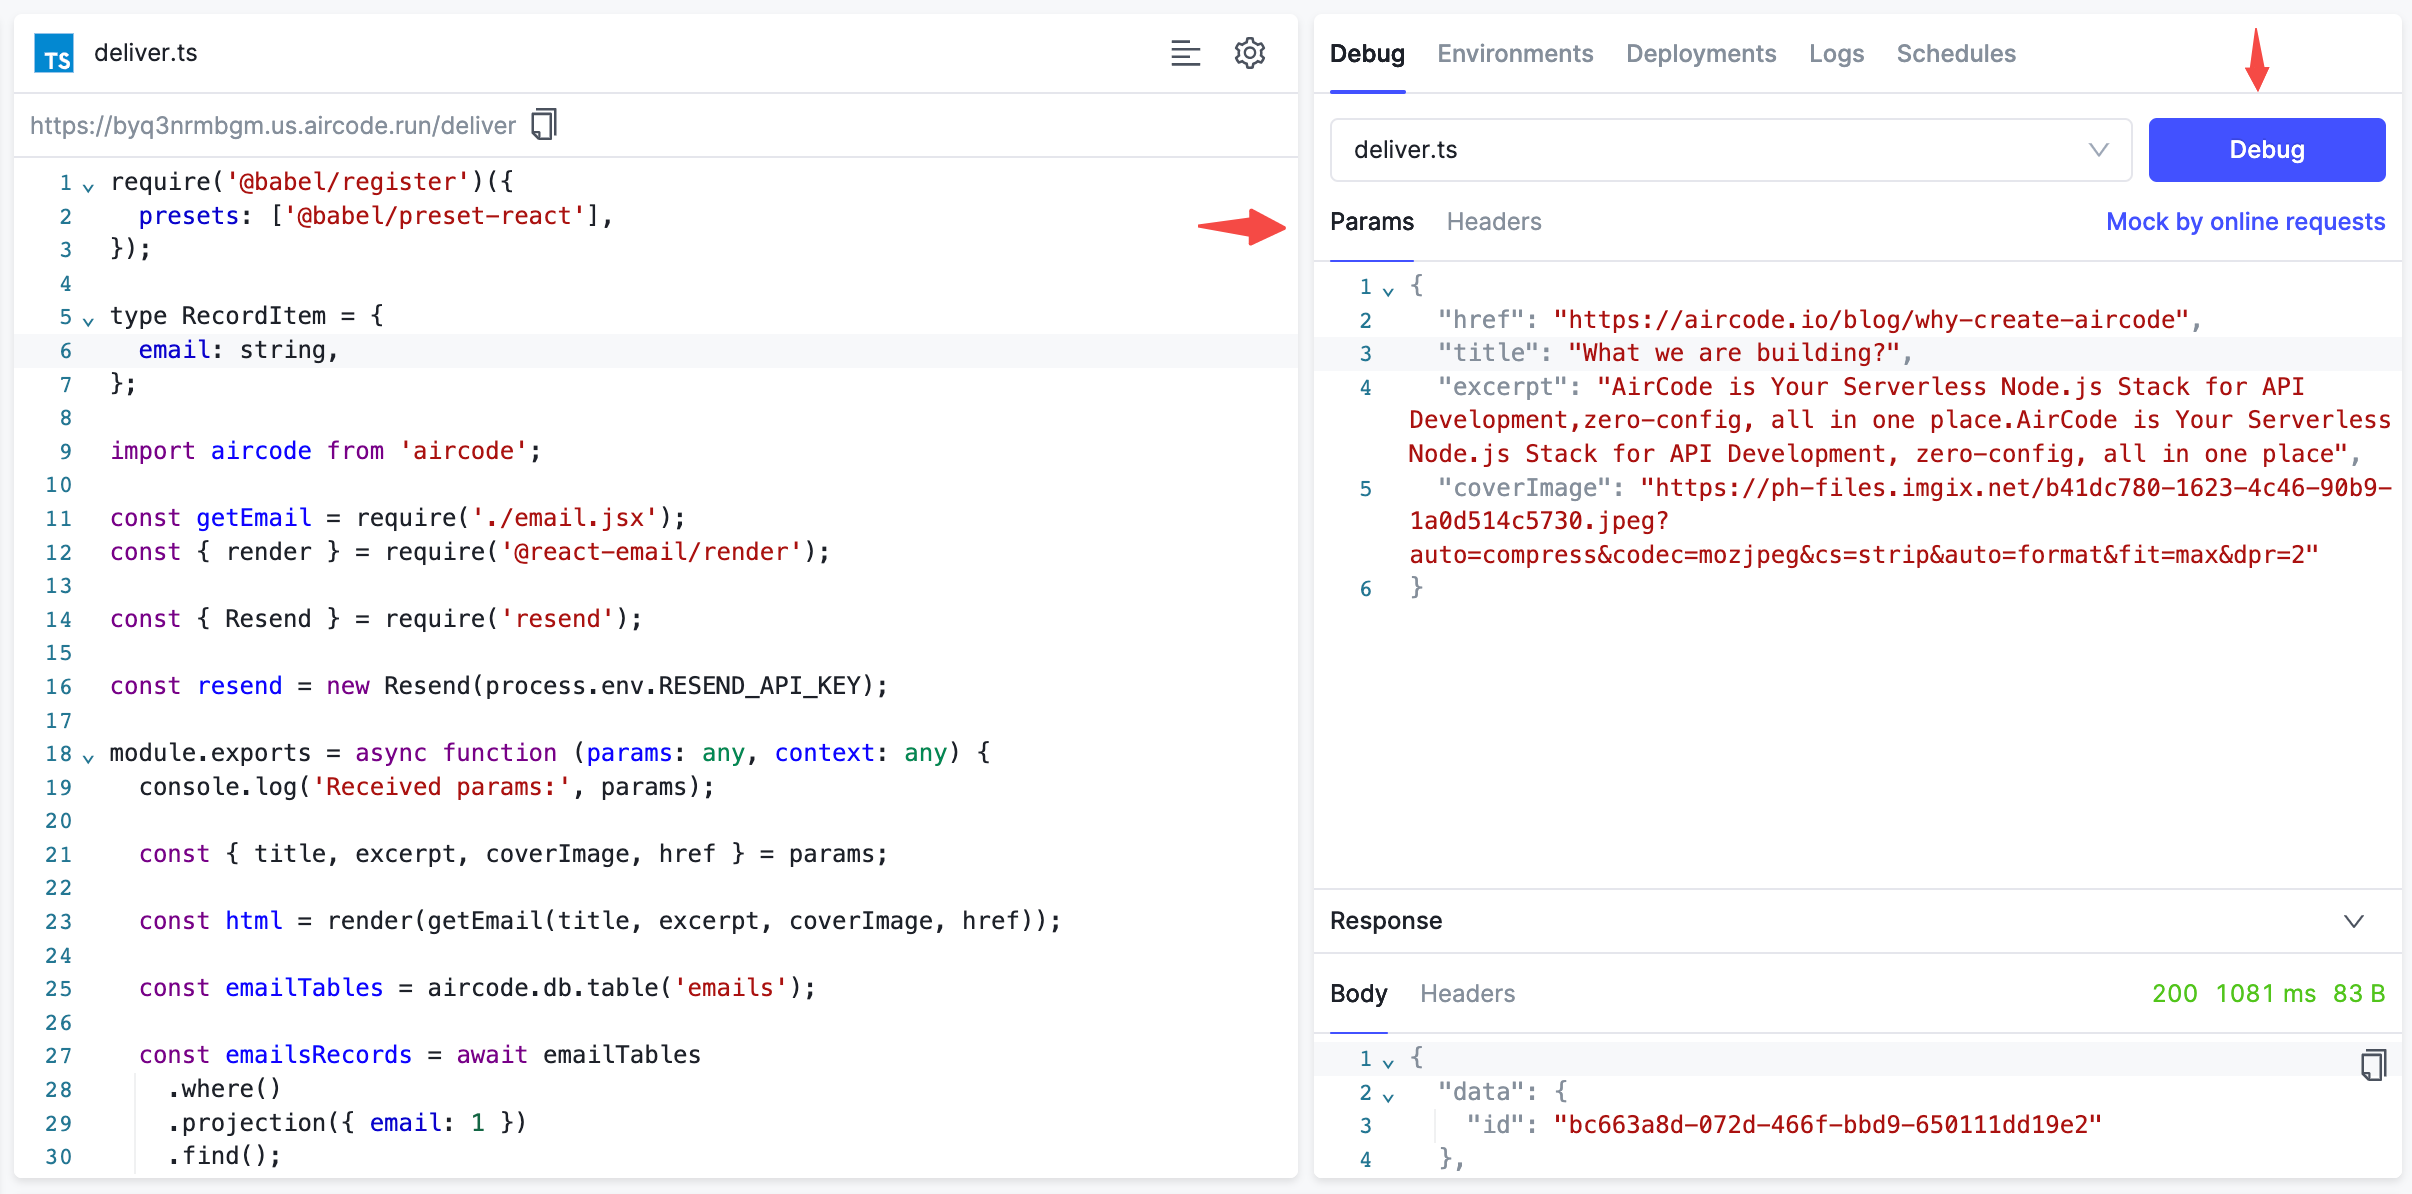
The test data you can paste to Params panel:
{
  "href": "https://aircode.io/blog/why-create-aircode",
  "title": "What we are building?",
  "excerpt": "AirCode is Your Serverless Node.js Stack for API Development,zero-config, all in one place.AirCode is Your Serverless Node.js Stack for API Development, zero-config, all in one place",
  "coverImage": "https://ph-files.imgix.net/b41dc780-1623-4c46-90b9-1a0d514c5730.jpeg?auto=compress&codec=mozjpeg&cs=strip&auto=format&fit=max&dpr=2"
}
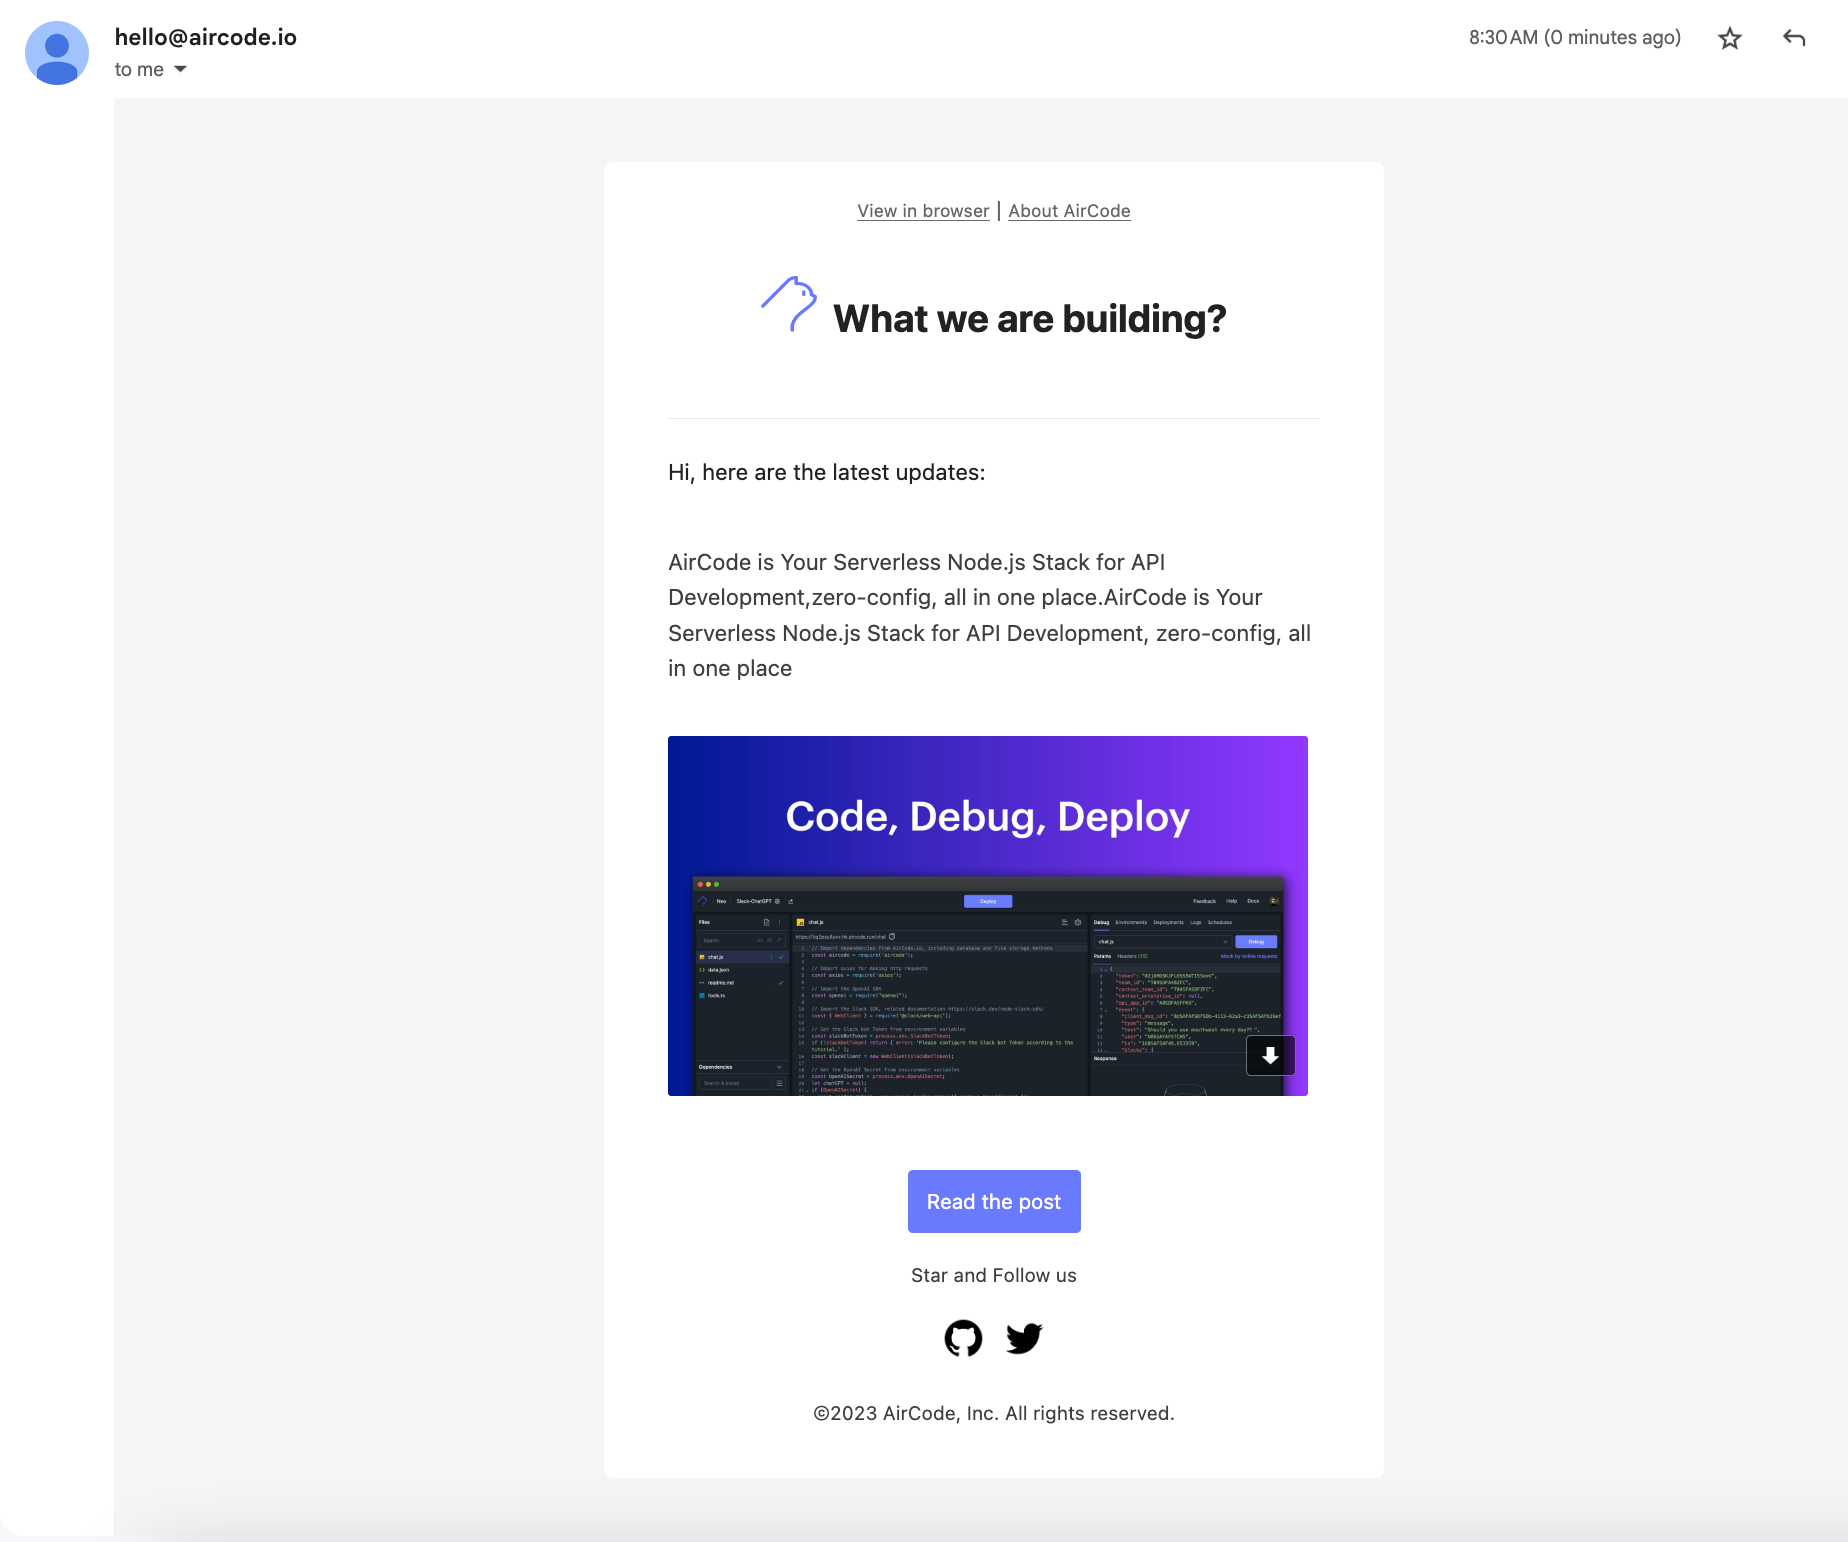
Congratulations on getting things to work! 🎉
Conclusion
So far, you've learned how to create a beautiful email with React, communicate between a Next.js and Node.js app, and send email notifications using Resend SDK.
The source code for this tutorial is available here:
Thank you for reading! Let us know on Twitter if you’d be interested in a tutorial for that. We can’t wait to see what you will build!
Want product news and updates?
Sign up for our newsletter.